
Even if you’re using an old, worn-out, un-waxed board, snowboarding can still be a lot of fun. But it’s truly amazing how much faster, smoother, and more efficiently a properly waxed snowboard is going to perform out on the slopes.
Although waxing your snowboard isn’t a very complicated process, many snowboarders aren’t quite sure how to do it on their own. Of course, the simple alternative is to bring your board into a ski and snowboard shop and having it waxed professionally.
But learning how to do this on your own can save you both time and money, and it’s simply part of the knowledge you should have if you want to truly master the sport of snowboarding.
So with that in mind, I thought it would be a good idea to put together this step-by-step guide on how to wax a snowboard. Keep reading, and we’ll go over the importance of having a properly waxed board, as well as how you can easily do it yourself!
Although the most obvious reason for waxing a snowboard is to improve its speed and performance on the slopes, there is one much more important reason for doing it: to protect your board and to prolong its life as much as possible.
The fact is that while you’re shredding down the mountain, the bottom of your snowboard comes into contact with not only snow, but sometimes slush, ice, rocks, and other types of fine debris as well.
Over time, this eventually wears away at the surface of your board, causing it to become rougher, in turn, and to produce more friction while sliding.
But this slight reduction in speed isn’t really the biggest problem.
But if the wax on the bottom of your board were to wear away completely, it leaves the board’s metal edges and base completely exposed, potentially leading to irreparable damage. Plus, waxing your board also helps moisturize and hydrate its base, which helps reduce the likelihood of splits and cracks in the future.
Although you’ll hear snowboarders talking about rub-on waxes and factory wax, when it comes to hot waxing your snowboard, there are three different types of wax: warm waxes, cold waxes, and all-temperature waxes.
Warm waxes are designed to perform better when riding in warmer conditions, such as one those warm, slushy spring days before the snow melts. Typically, warm waxes are designed for use on days where the forecast is between 32°F to 26°F.
Just as you’d expect, cold waxes are the opposite of warm waxes and performed best when used on colder days that are between 28°F and 21°F.
Finally, all-temperature waxes are designed to be a more versatile type of snowboard wax that works in all conditions. You’ll typically find all-temperature waxes in the form of rub-on wax, which is applied for a shorter, more temporary performance boost, ideal for those who do a lot of park riding.
Now, with that out of the way, let’s get to breaking the steps on how to properly wax your snowboard.
Waxing your board isn’t all that complicated, but you will need to acquire a few tools to get the job done right, namely a hot iron, specifically designed for melting and applying snowboard wax.
So before getting started, make sure to gather the following items:

Once you’ve assembled your tools, find a well-ventilated area, such as a garage or workshop, and make sure that your board is at room temperature. Waxing your board while the base is still freezing cold could prevent the wax from adhering properly to the base, causing poor, sloppy finish.
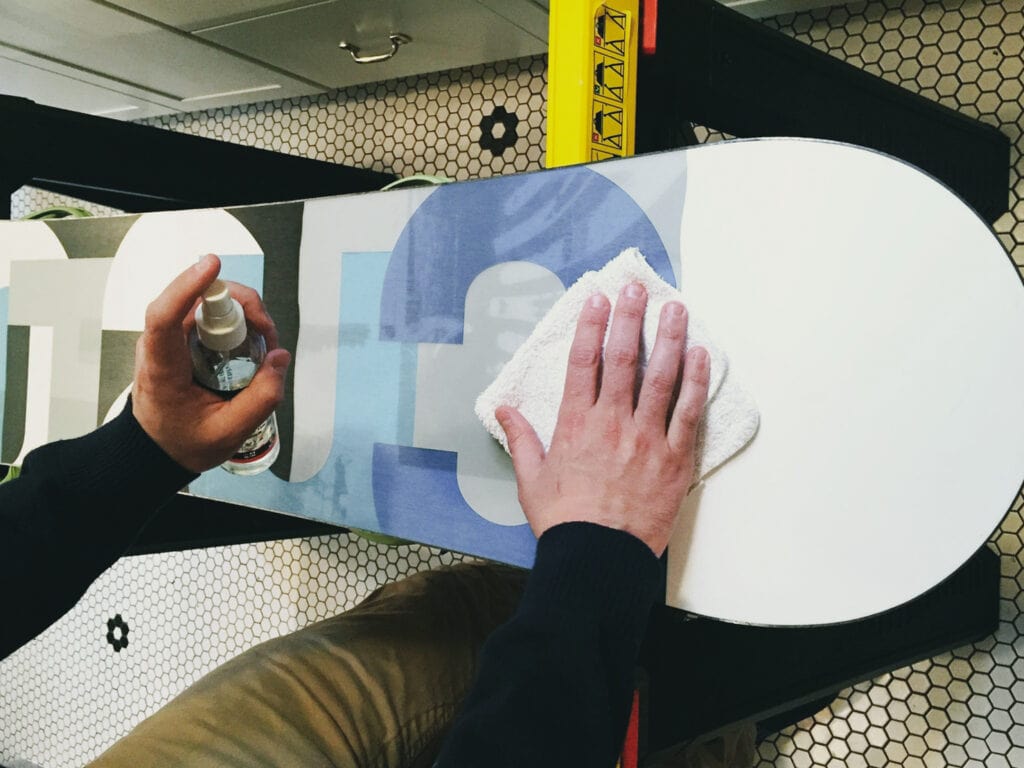
The first thing you’re going to want to do is to clean your snowboard using a citrus-base cleaner or any other specially-designed snowboard cleaning product. Use a soft brush or rag and gently scrub and clean your board before drying it with a towel.
It’s important to make sure to remove any dirt or contaminants, or else the wax won’t properly adhere to the snowboard base.
We recommend this base cleaner: PURL Eco Base Cleaner

Next, you’ll want to plug in your waxing iron and set it to the desired temperature, which is usually between 120°F and 140°F. However, the key here is to make sure that the iron is hot enough to easily melt your wax, but not too hot that it smokes upon contact.
As far as waxing iron goes, we recommend the Swix T77 or simply getting a full maintenance kit like this one from Demon United.
Once your iron is hot enough, start by holding it vertically, directly above your board, and begin pressing the wax to the iron. As it melts, you’ll want to slowly drip the wax over your board, placing a drop or two every couple of inches along the entire surface of the board.
Personally, I recommend starting by placing drops all along the perimeter of the snowboard and then filling in the middle. The key here is only to not go overboard and accidentally apply too much.
But you still want to have enough wax applied to be able to spread it into a thin layer on the entire surface of the board.
Personally, I prefer the Super Hot Sauce wax from Hertel. It's been my go-to for years as it's an affordable wax that excels in any climate or temperature and it seems to hold up extremely well.
Once you’ve applied a sufficient amount of wax drippings, use the iron in a horizontal motion, and begin spreading the wax droplets out evenly across your board. Make sure to keep the iron moving at all times, and using gentle back and forth motions, create a thin layer from one edge of the snowboard to the other.
Keep in mind that you might not get this perfect the first time you try. But once you’ve waxed your snowboard a few times, you’ll quickly get a hang of the correct motions to use to create a thin, even layer of wax.
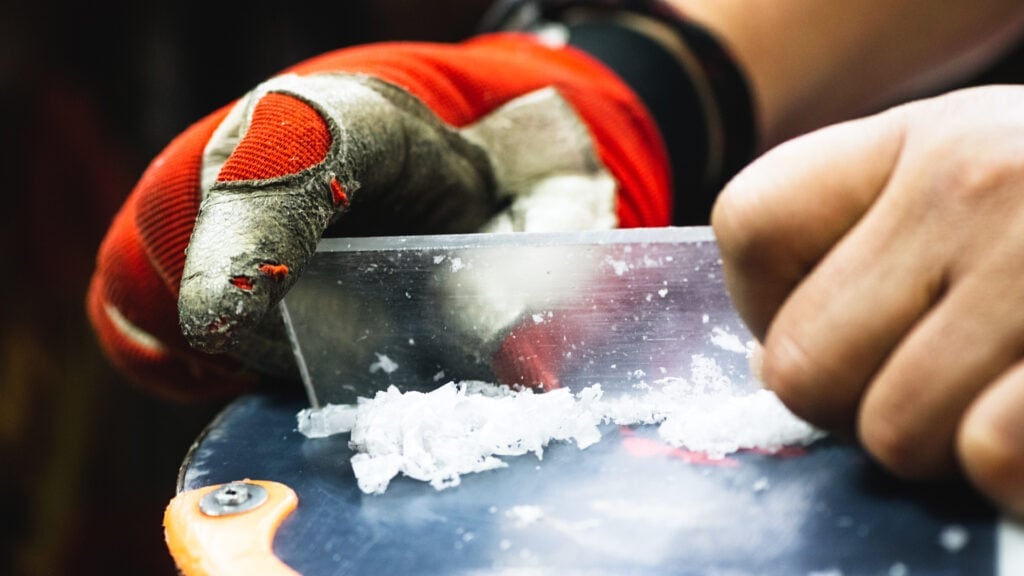
Once you’re satisfied with your wax application, unplug your iron, set it aside, and allow your board to cool for a good 15 to 20 minutes. Then, after the wax has had sufficient time to cool, it’s time to use your scraper and remove any excess wax.
Although there are metal-edged scrapers available in most shops, if you’re new to doing this, I’d recommend using a hard plastic scraper instead. This way, you’ll be less likely to scratch or cause any damage to your snowboard’s base.
Something as simple as the Swix Wax Scraper will go just fine here. It's a small investment that'll get you a long way and last for years.
Place the scraper at roughly a 45° angle to the edge of the board, and by using even strokes to scrape away the excess.
Once you’ve finished scraping off any excess wax, the edge of your snowboard should feel smooth and seamless to the touch. At this point, make sure to take a look along the edge of the board to see if there are any bumps or areas that are missing wax.
If necessary, perform any touch-ups as needed. And then, it’s time to clean up your mess and put everything away.
Personally, this next step is my absolute favorite!
After you’ve cleaned everything up and have put your tools away, it’s time to grab the rest of your gear and head out to the mountains for a smooth, frictionless snowboarding!
For those who are newer to the sport, after the first few times you’ve used a board with a fresh coat of wax, you’ll quickly see how much of a difference it can make!
Now that we’ve explained the importance of waxing your snowboard and you’ve mastered how to do it on your own, let’s take a quick look at a few frequently asked questions that might still be lingering on your mind.
Yes, it absolutely does! In fact, a snowboard with fresh wax experiences less friction between itself and the snow, which means a smoother, faster ride. Plus, by waxing your snowboard regularly, you’ll moisturize and coat the base with a protective layer, which helps it last a lot longer than it would without wax.
While some people will give you different answers on this, most agree that you should wax your snowboard after every three or four days worth of riding. However, if you happen to do a lot of park riding, your board is going to take much more of a beating. So if you do, you may need to wax your board even more often.
But essentially, your board will need to be waxed whenever it gets dried out and there’s no wax left. However, it’s better to always wax your board before it dries out, to help prevent more wear than necessary.
If you’re unable to tell if your board is dried out by looking at it, try scratching your fingernail along the bottom. If you’re able to leave a faint line in the wax with your nail, then you do, in fact, have wax on your board. On the other hand, if you’re not able to leave a line with a nail, then it’s time to apply wax.
If you don’t wax your snowboard, the factory wax that was applied before you purchased it will eventually wear away and then you’ll eventually likely start wearing away at the base when you ride on your board.
Eventually, this will end up causing irreparable damages, such as cracks and splits, potentially ruining your snowboard completely.
Aside from that, you’ll also experience a lot more friction while riding, which means that you’ll have a rougher ride, and your board simply won’t be able to reach the same speeds that it would if it were waxed.
The short answer is that yes, rub on snowboard wax is good. However, it’s ideal for a quick wax and performance boost in the midst of a day of riding, as opposed to be a more permanent wax job.
So, yes, rub-on wax is good, but it’s not going to be nearly as effective or as long-lasting as performing a thorough hot waxing.
There’s nothing inherently wrong with using rub-on snowboard wax, but just make sure that you understand that a coat of hot wax should still be applied every now and then to optimize performance and help extend the lifetime of your board.
It’s recommended that you set your iron temperature between 120°F to 140°F.
However, many hot iron are built differently and don’t always function at the same temperatures. Therefore, you might have to either decrease or increase your temperature, depending on the iron that you’re using.
In the end, you want it to be hot enough to quickly and easily melt your wax, but not too hot that it smokes and burns upon contact.
Most brands state that their factory wax should last for about a week’s worth of riding. But once again, if you’re doing a lot of park riding, factory wax might only last you a few days, and the key is to always ensure that your board is waxed at all times.
Therefore, make sure to check it regularly, after every day’s worth of riding. This way, you’ll quickly learn how much wax gets worn off after riding. In turn, you’ll get a better understanding of when your board does and doesn’t need to be waxed.
Basically, there’s no need to wax a brand new snowboard since virtually any snowboard will come with what’s known as “factory wax”. Factory wax is typically a spray-on wax, which is adequate for your first few days on the slopes.
In the end, waxing your snowboard isn’t only essential for a smooth, frictionless ride down the slopes, but it’s also crucial for protecting and extending the life of your snowboard itself.
Fortunately, waxing your snowboard isn't very complicated at all, and with the right tools and a little bit of knowledge, you can easily do it yourself at home.
Just make sure to closely follow the steps listed in today’s guide, and if you’re ever unsure of how to do it yourself, don’t hesitate to contact us for more tips, or simply bring your board into a local ski/snowboard shop for some professional advice.


